Project 1 - iOS Task List
Due:Wednesday, February 19, 2020 at 05:35PM
Specification
For this project, you are going to build a simple Task List app. Users will be able to open your app and add items to their todo list of things that they want to get done. Each item will have a name, a description, and a way to record whether it has been completed or not. Since we are early in the semester and have not yet covered data storage, the app should pre-populate with just a few example items at start up and work as intended while in use, but it does not have to remember the state of the list from run to run.
To begin work on Project 1 Start the Project in Blackboard.
Requirements
Your app must meet the following requirements and specifications. Deviating from these will result in a reduced grade. Remember this project is graded on a two (2) point scale. If you don’t meet all the requirements you will only get one (1) point.
You will be doing this app in Swift. A large number of tutorials you will find will be using Swift 2 and Swift 3 and the latest Xcode uses Swift 4. In many cases, Xcode will autocorrect to the correct version for you, but you need to be cognizant of it and adapt accordingly. You can’t just copy/paste and assume everything will work!
The app shall be made up of four total screens:
- a launch screen
- a task list screen
- a create new task screen
- a task details screen.
More detailed information about each screen is found below.
To accomplish this, you will (most likely) have some set of the following files in your project:
- AppDelegate.swift - Basically the “main” for the entire app. You probably won’t touch this.
- AddItemViewController.swift - The Add New Item controller code.
- EditItemViewController.swift - The Edit Item controller code.
- Main.storyboard - The storyboard for most of your app (not count the launch screen).
- LaunchScreen.storyboard - Built-in by default, you just need to add your names to this.
- TaskItem.swift - The model class for this app.
- TaskListTableViewController.swfit - The controller for the list screen.
- TaskListTableViewCell.swift - The table cell adapter for this app (may not be needed)
Loading Screen Requirements
Something cool. At a minimum, not a blank screen.
TaskListTableViewController, TaskListTableViewCell, and TaskItem
A very large portion of your overall code base will go into these three files. There are a lot of tutorials out there on how to do this. You should read through several to get a feel for all of the different functions you have to override, etc. Here is a sampling:
- Swift Language Reference
- Apple’s Tutorial
- raywenderlich.com
- iOS Cookbook Examples
- Ralf Ebert
- Making App Pie
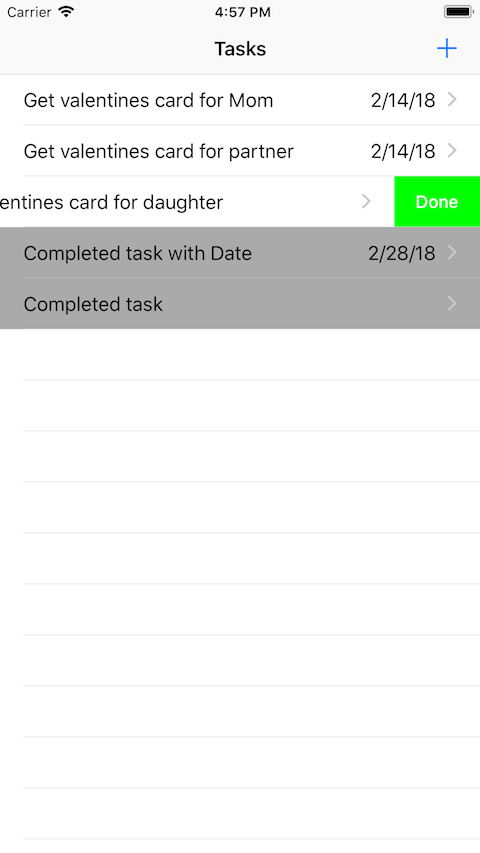
Task List Screen Requirements
- The list should be sorted first by whether the item still needs to be done or not then by date
- more recent dates at the top
- completed items move to the bottom
- Swiping right to left should show a button to mark the item done.
- The button should swap the done / not done state, and also change the background color of the cell to show its state.
- You should be able to tap on an item to edit it.
- After editing an item, when you return to the task list the item should be properly updated and in the right sorted location.
- Tapping on the + in the upper right takes you to the add new screen.
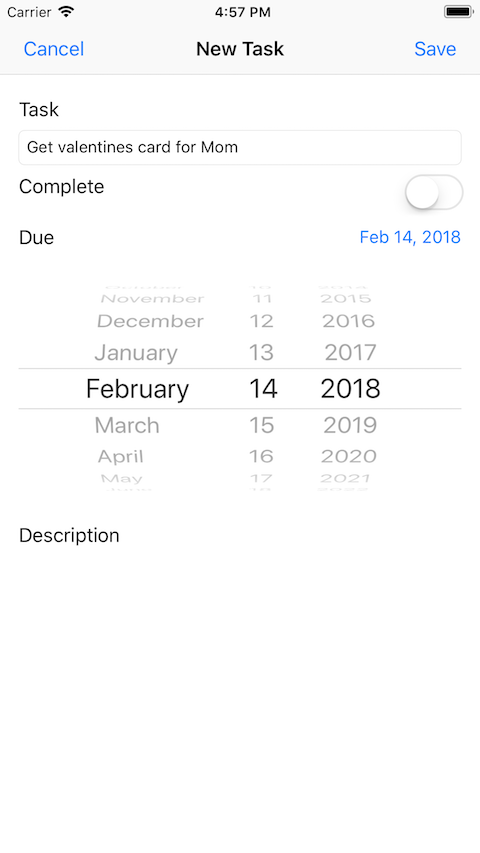
Add Item and Edit Item Requirements
- You should have Cancel and Save buttons along the top in a Navigation Controller.
- Make sure that any numeric fields are numeric entry and that the date is a date-only spinner.
- Added or edited items should appear in the list upon save and the order fixed if needed.
- It is possible to use only one scene to do both add and edit. If you want to do this, you are welcome to do so, but note that it can be a bit more complicated (if overall it is less code).
Moving between scenes and passing data requires the use of segues. Examples:
Storyboards
Layout management can be interesting in Swift and Xcode. Again, here are some resources:
Example Screenshots


Submission Notes
When we work with GitHub this semester, I will take the state of your repository at the start of class on the due date and use that for grading. There is nothing you need to do specifically in GitHub.
- You must NOT include a build for iOS (it’s doesn’t work anyway) in your repository.
- You must create a
README.mdfile that describes your project and:- Project/App Title
- Basic instructions on usage
- Any special info we need to run the app
- Lessons learned (at least one paragraph)
- You may write your report in Markdown format, that would be nice.
Definitions
The Internet Engineering Task Force (IETF) Best Practice Document RFC 2119 Key Words for use in Request For Comments (RFC) to Indicate Requirement Levels defines several keywords that are used in this assignment and throughout the course. Pay special attention to where they appear in the assignment.
Some of the keywords used in this assignment are as follows;
MUST: This word, or the terms REQUIRED or SHALL, mean that the definition is an absolute requirement of the specification.
SHOULD: This word, or the adjective RECOMMENDED, mean that there may exist valid reasons in particular circumstances to ignore a particular item, but the full implications must be under.
MAY: This word, or the adjective OPTIONAL, mean that an item is truly optional. One vendor may choose to include the item because a particular marketplace requires it or because the vendor feels that it enhances the product while another vendor may omit the same item.
Much of this project is adapted from a similar course, CS 4720 Mobile Application Development at University of Virginia. Thank you to UVA for the heavy lifting. Green is my pepper.